How to set up multiple displays on Windows 10 for remote work in 2022. For your productivity, two screens are better than one. Let’s see how you can customize your second monitor with the best tools available online.
Whether you’re a content creator, programmer, data analyst, gamer, product designer, UI/UX designer, or someone who’s expected to work from home, a system with multiple monitors not only looks great but can significantly improve productivity when multitasking with several apps. However, a multi-monitor setup is only practical as long as you configure it correctly.
To get your PC to recognize multiple monitors, ensure your cables are appropriately connected to the new monitors, then press the Windows logo key + P to select a display option.
- Select Start > Settings > System > Display. Your PC should automatically detect your monitors and show your desktop. If you don’t see the monitors, select Detect.
- In the Multiple displays section, select an option from the list to determine how your desktop will display across your screens.
- Once you’ve selected what you see on your displays, select Keep changes.
You can change the resolution of your displays. However, we suggest using the recommended solution to get the most out of your displays.
The Complete Guide to Setting Up Multiple Displays in Windows 10
Before configuring multiple monitors on your device, make sure that all the necessary cables are connected to the monitors and the computer. This includes connecting power and video signal using VGA, DVI, HDMI, or DisplayPort (recommended) cables.
If you’re not sure, confirm the make and model of the monitor (usually from a sticker in the back), and search online for the manufacturer manual to get a better idea on how to connect the display.
Step 1: Picking Your Monitor
Picking a second monitor couldn’t be easier, assuming you’re already viewing this via a PC monitor. That’s because most modern monitors in the market are both flat-screen and high definition (16:9 aspect ratio). This allows users plenty of space either in landscape or portrait mode. For example, a simple 23.8-inch Acer monitor can give you crisp 1080p resolution in vivid color.
Larger screen sizes and display resolutions typically determine higher price points. Yet, the setup for an expensive or budget monitor is exactly the same. For a basic dual-monitor setup, not much more than a 23.8-inch display would be necessary. You can even use your laptop as a second monitor.
Proper Cable Input
More important than your new monitor’s dimensions is the proper cable type needed to connect your monitor to its appropriate port. Many confuse one cable type for another, which can be a serious hassle. For a multiple monitor setup, you’ll have to ensure that your graphics card supports multiple monitors in the first place.
There are a few types of cables that you will generally encounter when connecting a monitor to your PC: DVI (white by default), VGA (blue by default), HDMI, and DisplayPort.
HDMI and DisplayPort are the newer types of connections for monitors, while DVI and VGA are older. There are many benefits to these newer cable types, two of which are immediately pertinent: newer cable types offer better image display, and DisplayPorts function as the Swiss army knife of cables by adapting to all the connection types mentioned.
Ensure you know the cable type required to connect your monitor to your PC. Most of the time, no cables are provided for you.
Monitors and displays connect to the PC via its graphics card, otherwise known as a GPU. The GPU handles the graphics processing capabilities of a PC, so you’ll naturally have to connect your monitor to your GPU component. Ensure you’re connecting your display to the primary graphics card used in your PC—often an external GPU—and not the default, integrated graphics ports.
We’ll compare the above monitor’s possible connection types to the following, a mid-range ASUS TUF Gaming GeForce RTX 3070 OC Edition.
Its display outputs include 2x HDMI 2.1 and 3x DisplayPort 1.4a. So, while you wouldn’t be able to connect a VGA cable from your monitor to this graphics card, you would be able to use an HDMI or DisplayPort connection.
If you have multiple monitors that use DisplayPort but only have one space in your graphics card for that type of connection, you’ll have to use a DisplayPort hub with multi-stream transport. The hub will connect to your only available DisplayPort port and allow you to connect as many as three monitors to it. Or you could opt for a monitor with daisy-chain capabilities.
Step 2: Configuring Second Monitor
Once your monitor is connected to your GPU, turn on both your PC and your monitor. Wait for it to display an image. If your monitor remains blank, check your connection.
Once you see an image on your second monitor, right-click on your desktop and select Display settings.
You should see your second display within the settings image. Windows 10 conveniently provides this interface, so users can easily configure multiple displays.
First off, drag and drop your monitor to configure the display position. If you have a second monitor on the left side of your first, but the display settings show the second monitor on the right, drag the second monitor to the left of your main display.
The Display window allows for both X and Y coordinates, meaning monitors don’t have to be placed directly beside one another to function. If you’re confused about which display your PC refers to, click the Identify button to view which monitor is which.
Next, scroll down the options until you reach Resolution. This will be the primary setting you would have to change to get your monitor in working order.
For one, Windows 10 will sometimes display your monitor at a smaller resolution than native to the display. Set your Resolution to the Recommended setting (or higher).
If you have an older monitor but are using a newer graphics card, you can also adjust settings to hike your resolution higher than possible by default.
Continue changing whatever options suit you. Orientation will allow you to change your display’s portrait or landscape orientation. Multiple displays allow you to extend or mirror your displays. Remember to select the display you want to change before you change it by clicking on the display image.
The option labeled Make this my main display will, among other things, make programs display on the primary monitor you’ve chosen.
Taskbar Display
Another subtle aspect of a multi-monitor setup is what you’ll do with the taskbar. The toolbar may become an issue if you’re working on a clean desktop setup.
To change or remove your taskbar, head to your background settings by clicking on your start menu, typing background, and selecting the Background settings option. Expand the window and select Taskbar. Scroll down until you see a Multiple displays section.
To turn the taskbar off on all displays (except your primary monitor), set the Show taskbar on all displays to Off. If you leave it on, you can decide whether the taskbar will show all pinned programs or only programs present within the given monitor under the Show taskbar buttons on.
Additionally, you can choose to show or hide program text labels under Combine buttons on other taskbars.
Cross-Platform Controls
What if you have two PCs with different operating systems and would like to use both of them at the same time? It sounds impossible unless you’ve heard of Synergy. Synergy is a mouse and keyboard sharing application that allows users to use any combination of Mac, Windows, or Linux PCs simultaneously, seamlessly, with one keyboard and mouse combination.
Synergy is impressive, even for nerds like myself. Setting up a new Linux distro while using your regular PC? You can do that. Have an office setup that uses both Mac and Windows but don’t want to spend your time unplugging the mouse and keyboard from one to use the other? Are you the office tech guy who constantly has to correct a coworker’s mistakes, but hates walking over to their desk? Synergy does all of this and more.
Keep in mind that Synergy isn’t free. $29.99 will get you the basic, complete version of Synergy, while $39.99 will get you such excellent features as clipboard sharing (copy and paste anything from one PC to another). Nevertheless, these are one-time fees to use on as many PCs as you require. In other words, you’re paying a one-time payment to never use a separate mouse and keyboard combo on different computers for life!
Step 3: Customize Your Multiple Displays
Now that your display is in working order, you can consider customizing your second display. Even if you enjoy customizing displays, your work will often go unnoticed in a single display setup.
With multiple monitors, you can sit back and enjoy your customized desktop (or others can enjoy it for you) without having to abandon your work.
Multiple Wallpaper Setup
As trivial as it may sound, part of the fun of a dual or multi-monitor background is using multiple backgrounds. No longer are you tied down to a stale, single background. Better yet, it’s readily available to do in Windows 10!
To use different backgrounds on multiple monitors, open your Background settings window again. Once your window is open, scroll down until you see the Browse button under the Choose your picture category. Click the Browse button and select the image you want to use as a background. Do this for as many backgrounds as you’d like to have.
Once you have your backgrounds slotted, right-click on its thumbnail image. You should see a selection labeled Set for all monitors or Set for monitor X. Select whichever one you’d like.
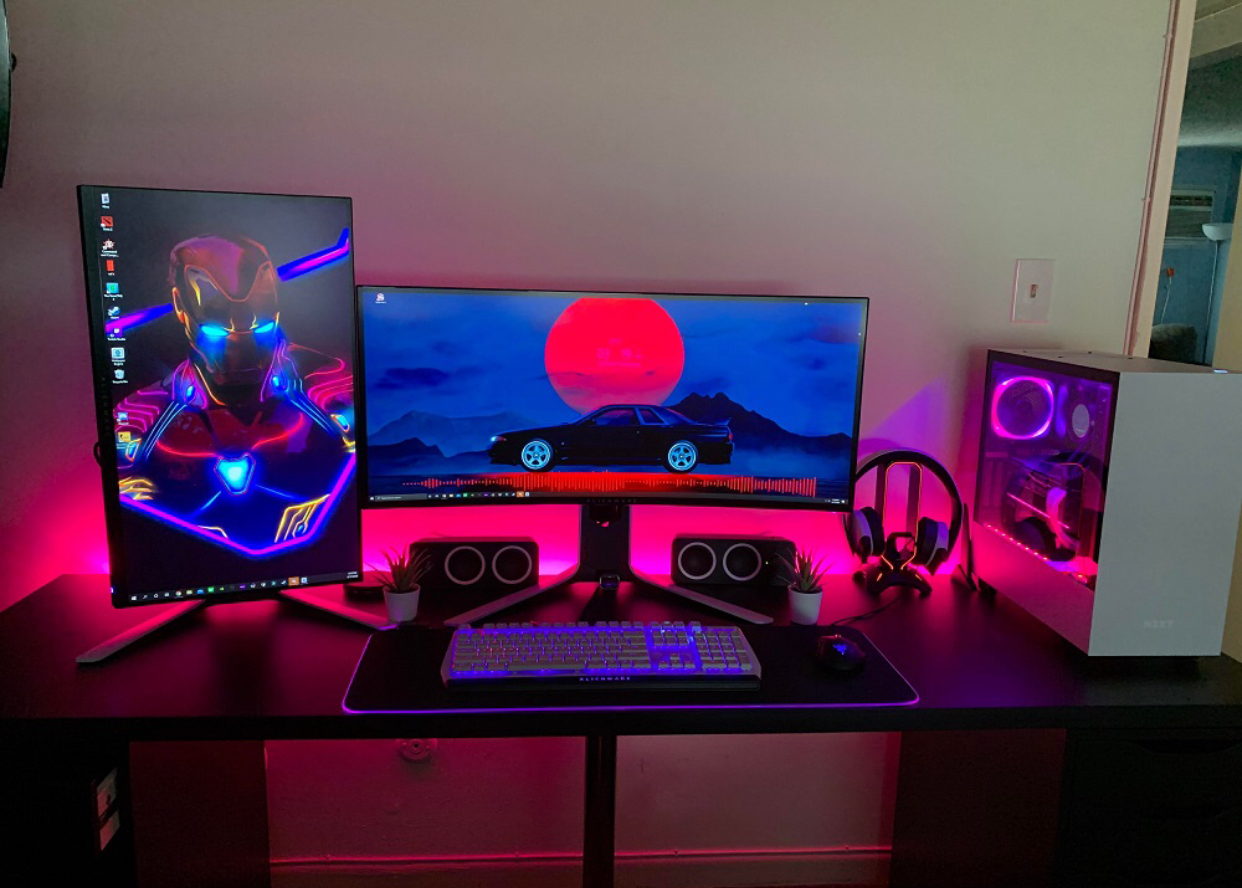
That’s it! While there are third-party applications out there that also allow for a multiple background setup, the easiest and fastest way to get it done is by default. Below is an example of two reflected wallpapers on a dual-monitor setup.
That’s all fine and well, but what if we want to create a single, extra-wide background image spanning all of our desktops?
Extra-Wide Desktop Background
To find an extra-wide desktop background, simply head to Google Images and enter the keyword of whatever image you’d like, followed by the phrase wide experience. Then, on the Google images page, click on the Tools option beside Settings. Then, click on the dropdown menu labeled Any size and select Large.
While not an exact science, this Google search should provide you with a flurry of appropriate, high-quality images to download and use.
Finally, head to your background settings again and Browse for your wide image. Then, under the Choose a fit option, select Span. That’s it! Now you know how one background spanning multiple monitors looks.
Maximize Display Across Multiple Monitors
This step is an extension of the step we just discussed above. Like wallpapers, you can also combine entire displays so that the Windows is maximized across all the monitors. While a widescreen might not increase productivity at work, it can be great for gaming or even watching movies. The steps of doing so can vary depending on the graphics card you have installed on your PC.
For more such interesting article like this, app/softwares, games, Gadget Reviews, comparisons, troubleshooting guides, listicles, and tips & tricks related to Windows, Android, iOS, and macOS, follow us on Google News, Facebook, Instagram, Twitter, YouTube, and Pinterest.


