Looking for documents on your computer can be a time-consuming process. You need to remember the name of the file and which folder you saved it in. Fortunately, Windows has an advanced search feature known as Enhanced search. This mode looks for everything on your entire computer.

To perform an advanced search in Windows 10, you need to turn on the Enhanced search mode. In this article, we’ll show you how to do just that.
What Is Enhanced Search Mode in Windows 10?
The search box in Windows allows you to look for files stored on your PC. This is the Classic search mode and comes as the default setting in Windows 10. However, it’s limited to specific locations like Documents and Pictures. Not all your local drives are scanned when performing the Classic search. You can, of course, go directly to the folder where you think the document is located to find it. But rooting around in this way takes a lot of time and can be frustrating.
In 2019, Windows improved its search feature and expanded its abilities. Enhanced search mode was introduced, allowing the entire computer to be scanned. Windows now updates data in the background while you are using your device, making it possible to store new files as you work. Enhanced search is disabled by default. To put it to use, you would have to activate the feature. However, there are some things you need to know before turning on Enhanced search.
What You Need to Know Before Enabling Enhanced Search in Windows 10
Enhanced search indexes every location on your computer. That’s a lot of data to get through. Hence, the process can take a while. Indexing also utilizes a lot of the CPU’s capacity, making it an energy-intensive exercise.
When performing your search, connect your laptop to a power source to ensure that the process is completed successfully. It would be best to carry out indexing when you’re not actively using the computer. The search will slow your device down, making it difficult to perform other tasks.
How to Turn On Advanced Search in Windows 10
With everything ready to go, you can activate Enhanced search mode in Windows.
- Click on the Windows start menu and navigate to “Settings.”

- Go to the “Search” category and tap on it.

- In the new screen that opens, press “Searching Windows.” It will be on the menu on the left-hand side.
- Navigate to “Find My Files” and tap on “Classic.”


Windows will start to index all the files on your computer. You should now be able to find whatever document you’re looking for. The process can take 15 to 20 minutes to complete, so you might want to sit tight.
The bottom of your screen will show a list of “Excluded Folders.” These are the files that don’t include the content you’re looking for. Items like Program Files are part of this list. You can go through the excluded folders to ensure that they don’t contain anything you were in fact looking for. If you would like to remove a portfolio from the “Excluded Folder” list, follow the steps below:
- Go to the Windows start button and find “Settings.”
- Click on “Search,” then “Searching Windows” on the opening page.
- Navigate to “Excluded Folders” and select the file you want to remove from the list.
- Next to it, press the “Remove Excluded Folder” button.


The document will now be available for indexing.
How to Manage Advanced Search in Windows 10
There are several things you can do in Enhanced search. For example, you can exclude some folders from the scan. The search will bypass these files and drives and not index any data from them. This will automatically exclude these files from the exploration process, as it did with your Program Files. To do so, follow these steps:
- Press the Windows start button and navigate to “Search.”
- On the next screen, click on “Searching Windows.”
- Move to the panel on the right side and select “Excluded Folder.”
- Tap “Add an excluded folder” and choose the file you want to be added to the list.
- Hit “Select Folder” to add it to the Excluded Folder category.


With Enhanced search, you can also speed things up by selecting the folders you want to be indexed. Here’s how it’s done:
- Under the “Classic” section of your search settings, press “Customize search locations here.”
- Click on “Advanced Search Indexer Settings,” located in the right-hand pane.
- Tap on the “Modify” button in the menu that opens.

- Pick the folders you want included in the search.
- Hit “OK” to confirm your selection.


As mentioned, performing an Enhanced search consumes a lot of power. You can ask Enhanced search to maintain your current power settings. To do that, navigate to “Indexer Performer” in the Enhanced search window. Toggle the “Respect Device Power Mode Settings” to the ON position.
How to Search Encrypted Files in Advanced Search in Windows 10
You can alter the files to be indexed through the advanced setting options. The changes you make will customize the search, providing more precise results. If you want the scan to include your encrypted files, follow the steps below:
- Tap on the Windows start button and open “Settings.”
- Click on “Search,” then “Searching Windows.”
- Under “Classic,” select “Customize search location here.”
- The “Indexing Options” window will open. Tap the “Advanced” button located at the bottom.
- Scroll to the “Index Settings” tab in the new screen that opens.

- Check the box marked “Index encrypted files.”


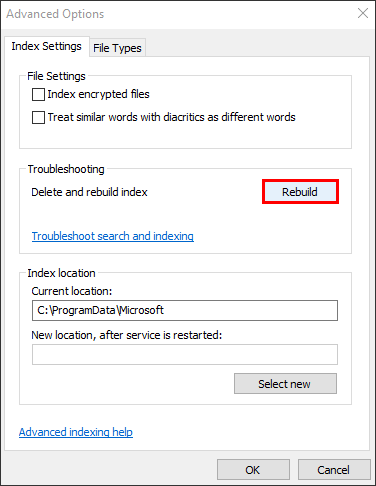
How to Troubleshoot Enhanced Search in Windows 10
Setting up Enhanced search requires navigating parts of your computer that you don’t often use. If you get lost somewhere along the way and would like to start over, here’s how to delete the index and start afresh:
- Go to the Windows start button and click on “Settings.”
- Navigate to the “Search” category and select “Searching Windows.”
- Tap “Customize search location here,” which is located under “Classic.”
- In the “Indexing Options” window that opens, scroll to “Advanced.”
- Press the “Index Settings” tab in the new screen that opens.
- Locate the “Rebuild” button.
- The “Index Location” section under it will allow you to choose where the new files are indexed.
Have You Found What You Are Looking For?
Windows 10 has a powerful search tool that few people are aware of. Its advanced search feature, known as Enhanced search mode, goes beyond looking for files in the obvious storage locations. It scans your entire computer, probing areas that you might not have thought to explore.
Enhanced search is customizable. You can choose which folders and locations the scan will be performed in. Be aware that it takes a lot of power to carry out the expanded probe. It may be better to look for your missing documents when you aren’t actively using the computer.
Have you ever performed an Enhanced search in Windows 10? Did you use any of the methods featured in this article? Let us know in the comments section below.
Disclaimer: Some pages on this site may include an affiliate link. This does not effect our editorial in any way.
For more such interesting article like this, app/softwares, games, Gadget Reviews, comparisons, troubleshooting guides, listicles, and tips & tricks related to Windows, Android, iOS, and macOS, follow us on Google News, Facebook, Instagram, Twitter, YouTube, and Pinterest.


